Tutorial - Creating a Puzzle

This guide is
designed to help you understand the basics of the program. We will step
through the creation of a simple crossword puzzle, choose the layout and
prepare for printing.
Creating a Puzzle
To create a puzzle,
first open the Crossword Construction Kit program. Click on File | New
Puzzle or press CTRL + W to open the Create New Puzzle window.
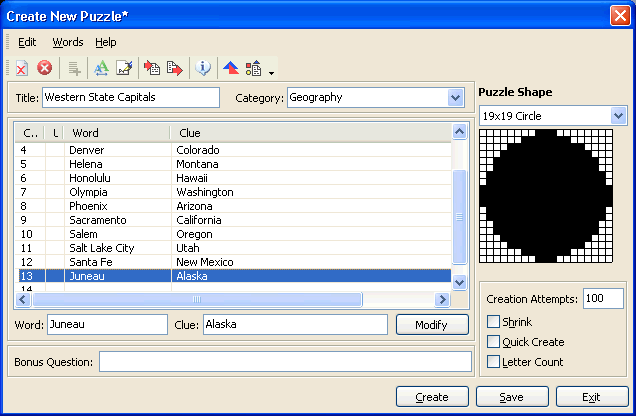
The cursor automatically
defaults to the title field in the Create New Puzzle Window. Enter "Western
State Capitals" (without the quotation marks) in the title field.
After entering the title name, press the TAB key to move to the category
field. Use the drop down list box to choose one of the three default categories
already defined or type in the name of a new category. For this tutorial,
enter "Geography" as the category.
Next, press the
TAB key twice to move the cursor to the Word edit box. Type Phoenix in
this field. Tab to the Clue field, type in Arizona and press Enter. Phoenix
will be placed as the first item in the word list. Arizona will be placed
in the Clue column. The cursor will return to the Word edit box so that
you can enter another word and clue.
Enter the following
western capitals and states into the puzzle using the steps listed above.
| Word |
Clue |
| Boise |
Idaho
|
| Carson
City |
Nevada |
| Cheyenne |
Wyoming |
| Denver |
Colorado
|
| Helena |
Montana
|
| Honolulu |
Hawaii |
| Juneau |
Alaska |
| Olympia |
Washington |
| Sacramento |
California |
| Salem |
Oregon |
| Salt
Lake City |
Utah |
| Santa
Fe |
New
Mexico |
After entering
the words, click on the Spell Check icon or click on Words | Spell Check.
The list of words will be checked for possible spelling errors. Any words
that cannot be found in the dictionary will be highlighted and a list
of possible corrections appear. You can opt to ignore, replace or add
the word to the dictionary.
Puzzle Shape
Now that the
puzzle words and clues are complete, it is time to choose a shape for
the puzzle. Tab to the Puzzle Shape field or click on it. If clicking,
click on the field so that it turns blue. This may require clicking twice.
Press the up or down arrow to see the different shapes available below
the description. Select the 21 x 21 diamond shape.
You can also
create your own shapes. This is discussed in the Creating
a New Shape tutorial.
Page Layout
The next step
is to select the page layout of the puzzle. The page layout defines the
position of the puzzle body, words, title, etc. Click on Edit | Modify
Page Layout or click on the Page Layout icon. This opens a small Change
Layout window (shown below) that displays the current default layout.
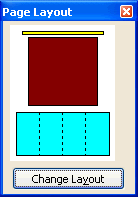
Click on the
Change Layout button. The Puzzle Page Layouts window will appear as shown
below. The program has six pre-defined layouts to choose from. Just highlight
the description to see the layout design to the right. A color key at
the top lists which parts of the puzzle each color represents.

Of course, if
you do not like any of the layouts provided, you can make your own. Just
click on the New button and start designing. The Creating
a New Layout tutorial walks you through this process.
For this tutorial,
highlight the Big Puzz, Small Clue layout and click on the Select button.
This returns you to the Create New Puzzle window. The small Page Layout
window will now display the layout we selected. This is the layout we
have assigned to our puzzle. You can now close the small Page Layout window
by clicking on the X in the upper right hand corner.
Puzzle Creation
The next step
is to see if all the words will fit into the puzzle shape selected. In
the lower right hand corner is a small box with several fields. For this
tutorial, leave the Shrink, Quick Create and Letter Count options unchecked.
Next we need
to adjust the Creation Attempts. In this field you can insert a number
from 1 to 999. This is how many times the program will attempt to fit
all words into the puzzle shape. Enter the number 100 into this field
and then click on the Create button. A dialog box will appear telling
you how many attempts have been made so far. After all attempts have been
made, click the OK button.
A Created
Puzzle window opens displaying the four best puzzle fits.
To the right will be a list of the words that fit into the puzzle and
a list of those that did not. If you like one of the puzzle fits, click
on it with the mouse, (which will highlight that puzzle) and then click
on the Save Puzzle button. You can zoom in on a puzzle fit by double clicking
on it with the mouse. If you do not like any of the fits, click on the
cancel button. You can then have the puzzle make more attempts or you
can change the puzzle shape to one that better fits your list of words.
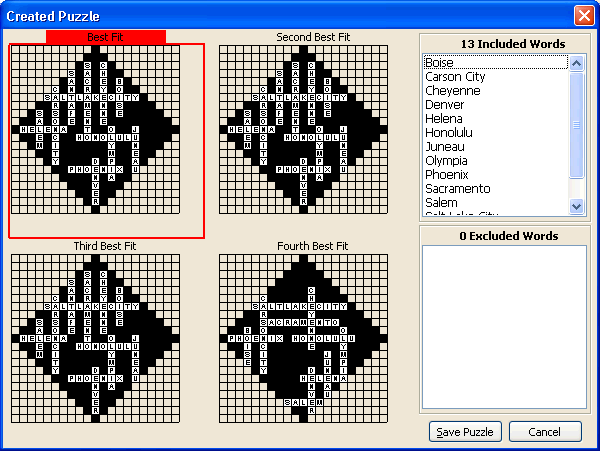
For this tutorial,
click on the Best Fit puzzle - the one in the upper left hand corner.
Then click on the Save Puzzle button. After saving the puzzle, you will
be brought back to the opening window of the program. The puzzle you just
created will be highlighted. Now you’re ready to print.
Print Puzzle
With the puzzle
you just created still highlighted, click on File | Print Puzzle or click
on the printer icon. This opens the Print window and a set of options
to choose from.
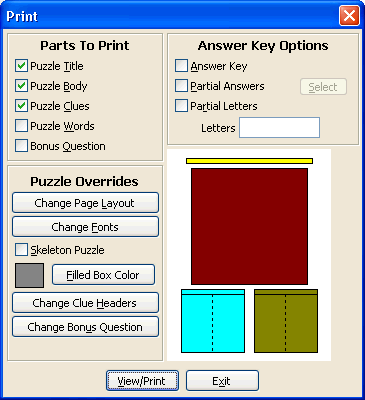
You can select
the parts of the puzzle you want to print, such as Title, Body, Clues,
Words and Bonus Question. The Puzzle Overrides section lets you make other
adjustments to the puzzle before printing. The Answer Key option allows
you to print out the entire answer key. Or you can print out partial answers.
Select the options
as shown in the image above. After making the selections click on the
View/Print button. A dialog box appears stating the puzzle has been generated.
Click OK and the puzzle layout and all options chosen will be displayed
on the screen for preview before printing (as shown below).
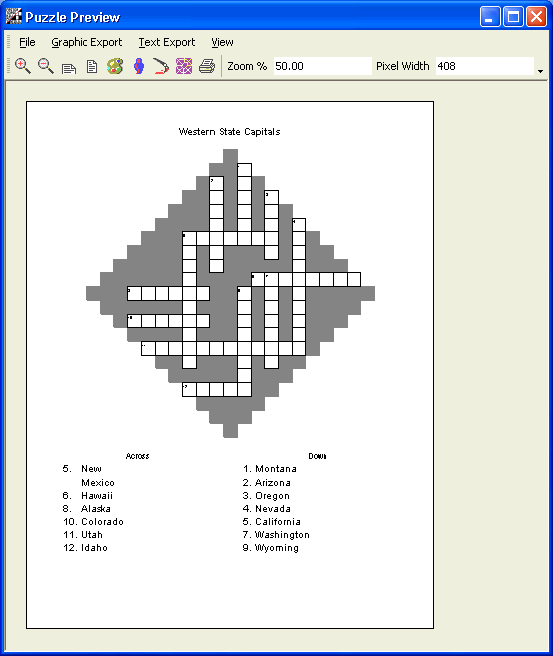
If everything
looks ok, click on File | Print Page to print a single page or click on
the printer icon. To print multiple copies select File | Print Multiple
Copies.
If adjustments
need to be made before printing, click on File | Exit or the X in the
upper right hand corner to return to the Reports window to make changes.
Exporting Puzzles As Graphics
At this point,
you can also choose to save the puzzle as a graphic image which can be
used in desktop publishers or word processors. From the puzzle preview
menu, choose Graphic Export and choose one of the file types or you may
click on one of the associated speed buttons. You will be prompted for
a file name. Enter one and click on the save button.
Summary
You have now
completed the basic functions for creating your own crossword puzzles.
We have created a quick, bare bones puzzle. You may want to take time
to learn about some of the other features of the program such as adding
graphics to the layouts, importing and exporting, and posting to web sites.